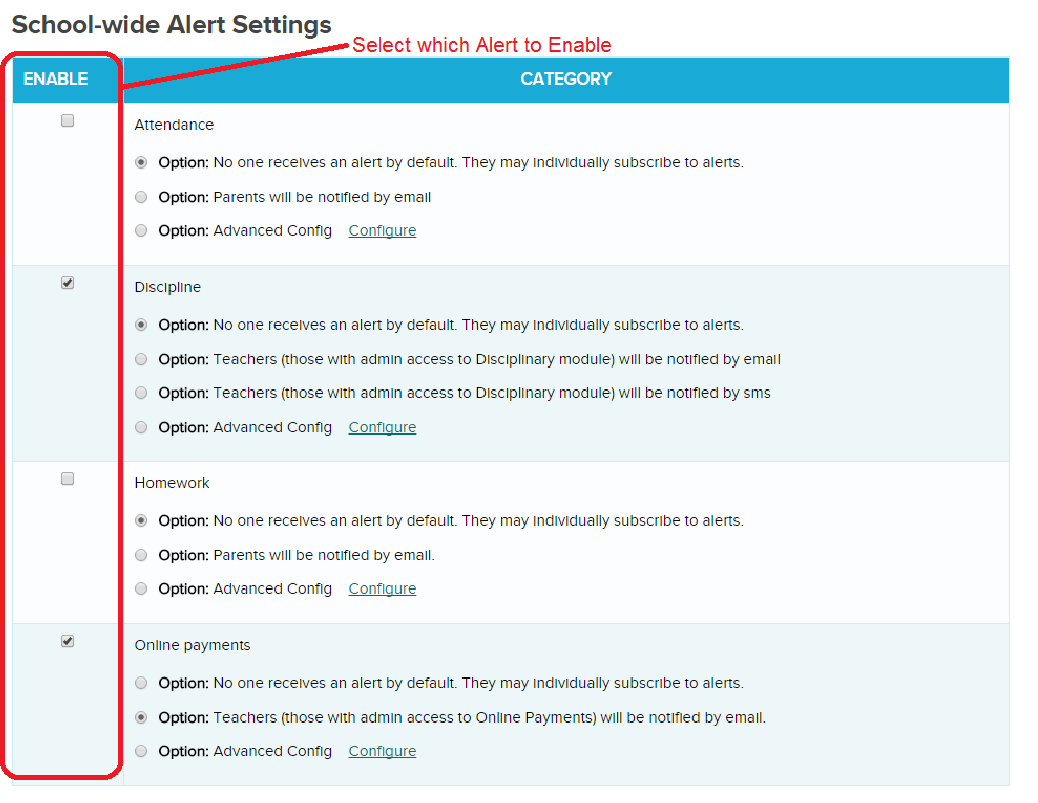
Some good news! QuickSchools has released an early beta version of our Alert Notifications module. We currently support only the following events, but once an alert is enabled, users can decide how to receive alerts. Current list of events:
Attendance: Parents can receive notifications when attendance is taken for their students.
Discipline: Administrators can receive notification when a new disciplinary incident is created.
Homework: Parents can be notified when homework is assigned.
Online Payments: Administrators can be notified when an Online Payment is received.
The following section appears at the bottom of the “Settings” > “School Profile” page if you have Alerts enabled on your account:
Enable Alerts for your users in QuickSchools (Private Beta)
Once an Alert is enabled, users can override any school-wide default preferences, and set their own personal preferences on how to receive notifications. The Preferences are located at the bottom of the “Settings” > “My Profile / Change Password” screen as follows:Read More »
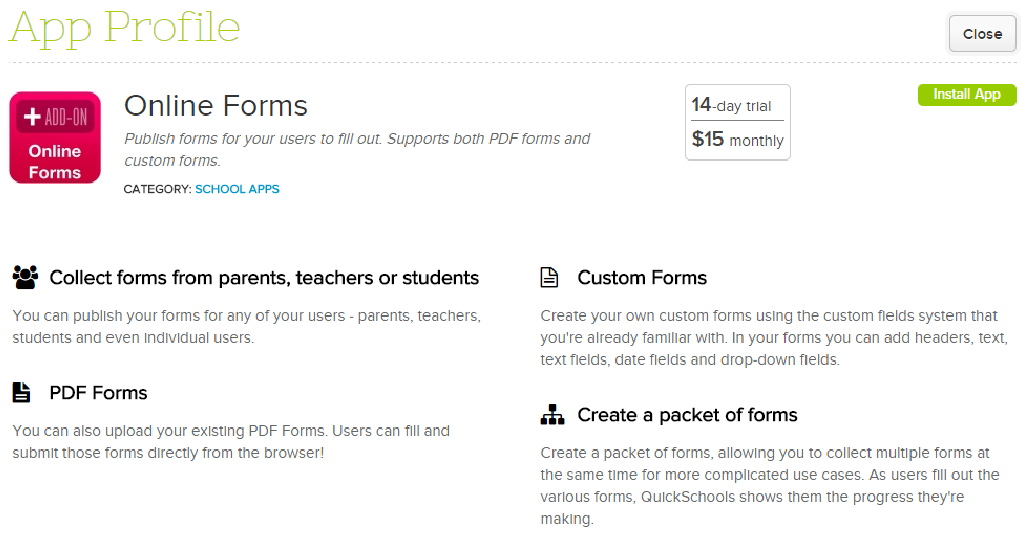
There’s a new app in our App Store called Online Forms, which will allow schools to collect information from any user within their QuickSchools account (Teachers, Parents and Students) via an Online Form.
QuickSchools Online Forms App
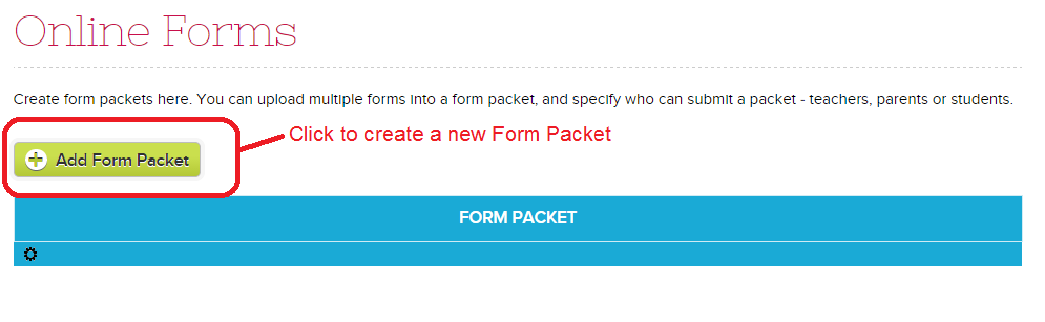
So here’s how it works. Once you’ve enabled the Online Forms apps for the appropriate users, you can then go to the “Online Forms” menu start creating your new Online Forms:
QuickSchools Online Forms List
Start by simply clicking on the “Add New Form Packet”. This will take you to the following screen:
Online Form Packet
When you first start out, the Form Packet is in “Draft” mode, which means nobody can see it unless you’re an administrator. Go ahead and fill in the details of the Form Packet (like Name, Description, Instructions and who can submit the form). There are several other sections you can fill, as described below:
Forms: These can be Custom Forms using our Custom Fields framework that you’ve seen in our other modules (details described below). Or, you can upload a fillable PDF file.
Supporting Documents: You can upload any additional files/documents that you’d like the user to access during the form submission process. These can be contracts, tutorials, and other reference files:
Workflow: The system comes with built in workflow statuses for “In Progress” and “Submitted”. Feel free to add any additional statuses that would be relevant to your process like “Reviewed” or “Completed”.
Advanced Settings: For advanced users, you can use this form to capture Enrollment/Registration information, as well as make it a multi-step submission process. We’ll describe more about these features in a future article.
Go ahead and click “Create Custom Form” to create a custom form using our Custom Fields framework, as per the Custom Fields module you’ve seen in other parts of our software (like with Students, Teachers, Parents/Guardians, Admissions, Discipline, and Lesson Plans), feel free to add any number of fields that you’d like to track. You can control the field type, as well as whether the field is required.Read More »
Since rolling out our Online Forms component for the QuickSchools Admissions Module, we’ve had several suggestions for improvement. The Custom Fields module in particular is a very powerful tool for recording virtually any information related to an application, especially since the Custom Fields support a variety of field types (like text, dates, dropdowns, etc). But sometimes making use of (or transferring) these custom fields after a student is enrolled can be a bit cumbersome.
So we’re happy to announce that the QuickSchools Admissions Module now supports the ability to use / manipulate custom field information to do one or more of the following:
Create Parent Records for the student: Create custom fields for relevant parent information that you’d like to store, and we can transfer this information into parent records attached to the student.
Create Fee Tracking Charges for the student: Calculate and create fees to be applied to the student once the student is enrolled.
The customization process requires knowledge of Java, and is not yet available for public use. So if you require this type of customization done on your admissions process, contact our technical support staff and we can get it set up for you.
Also, please do let us know if there are any other processes you’d like to automate when an applicant is enrolled as a student. We’re always looking for ways to improve.
We were pleasantly surprised by an unsolicited testimonial that was emailed to us just earlier today from the English Language Center in Oklahoma. This really made our day for our Live Chat Support Team at QuickSchools. We just thought we’d share it here with you:
QuickSchools is more than helpful…more like transformative. Our school had reverted to administrating from a series of spreadsheets. The spreadsheets actually came AFTER having tried a couple of mainstream, highly marketed school management systems. The other systems proved to be expensive to purchase, time consuming to use and expensive to maintain. In the end, they proved inadequate for smaller schools like ours. They cost us more in time and money than they helped.
With QuickSchools being cloud based, we were able to implement and start using it immediately. They have great online and real time support via a convenient chat box on each screen. Their customer service is second to none. They also have recorded videos for setting up and using each of the modules. QuickSchools also maintains our data and backups. We were up and running within a few days.
Our administrative staff and teachers love using QuickSchools because it has made their jobs so much easier and less stressful. Our focus now is on our students, our staff, and growing and improving our school. Since implementing QuickSchools we have been able to increase our student enrollment by 40% with no additional administrative personnel! That one fact alone is enough for us.
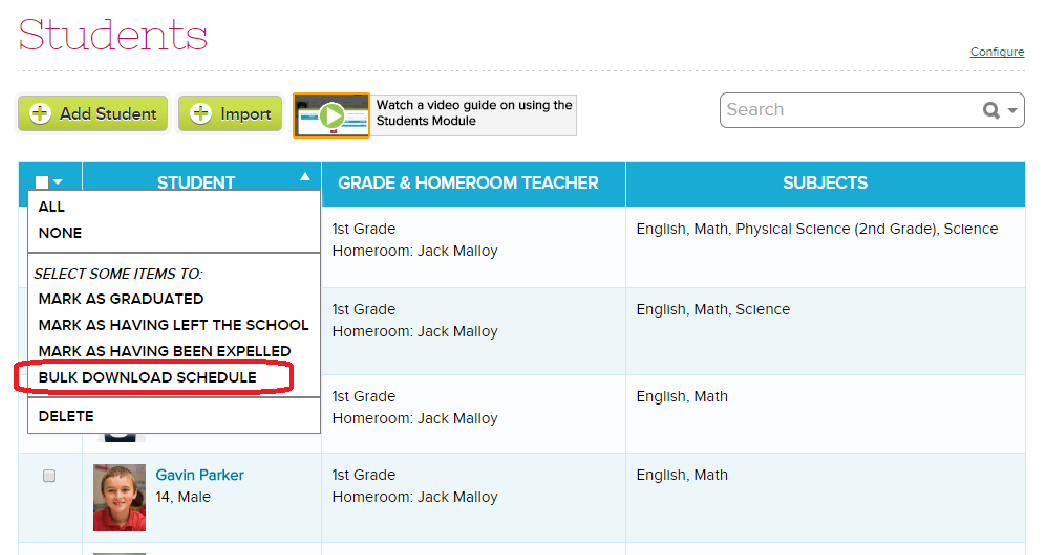
For those using the Scheduling module in QuickSchools, we now have the ability to bulk download schedules:
Bulk Download Schedule
From the Students listing, use the check boxes to select the appropriate students, and then use the dropdown on the top left corner of the table. This will produce a zip file containing PDFs for each student’s schedule.
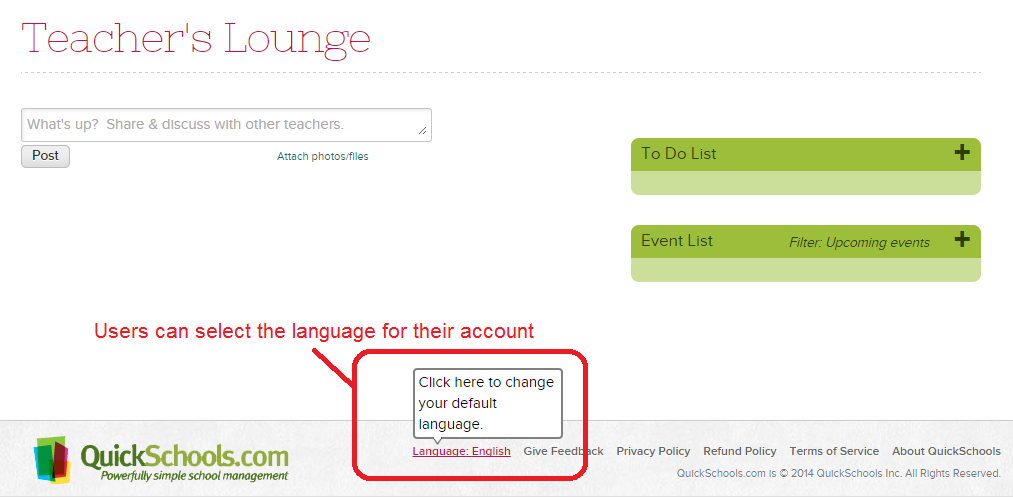
Each school can also set the default language for all users in their account. This screen is available to school administrators on the “Settings” > “School Profile” page:
Change the Default Language for your Account
If you’d like us to support a new language that is not listed, do let us know. We use a service called gengo.com to quickly introduce a new language (when there’s enough demand). Once translations come back, we can actually tweak them to account for context.Read More »
OPTIONAL: Configure your Standards-Based Gradebook
Configure how the final score is calculated for a particular standard
Configure how the Overall Grade for a particular subject is calculated based on assessed standards
Configure the Mastery Levels / Grading Scale
Start using the Gradebook
Define which standards will be assessed for the particular academic term
Create assessments by selecting specific standards to test for specific students
Review how students are performing based on assessed standards (Analytics)
Generate Report Cards: Report Cards will automatically display assessed standards for each student. The Subject-Based Gradebook also has an “Overall Grade” calculation for the subject, which can be transferred automatically into the report card.
We continue with steps 3 and 4 here. For steps 1 and 2, please refer to the original article.
Step 3: Start using the Gradebook
Once you’re satisfied with the standards and settings per steps 1 and 2, teachers can start using the Standards-Based Gradebook under the “SB Gradebook” menu. Just to re-iterate, if you’re using the Subject-Based Gradebook for a particular subject, you cannot user the numerical (i.e. default) Gradebook for that subject:
Getting Started with the Standards-Based Gradebook
So in the Standards-Based Gradebook, after selecting a subject, your student roster should appear. You’ll have several options available to you, and you should do them in order. Here are the steps:
Add Standard: Define which standards will be assessed for the particular academic term
Assessment: Create assessments by selecting specific standards to test for specific students
Assessment List / Run Analysis: Review how students are performing based on assessed standards (Analytics)
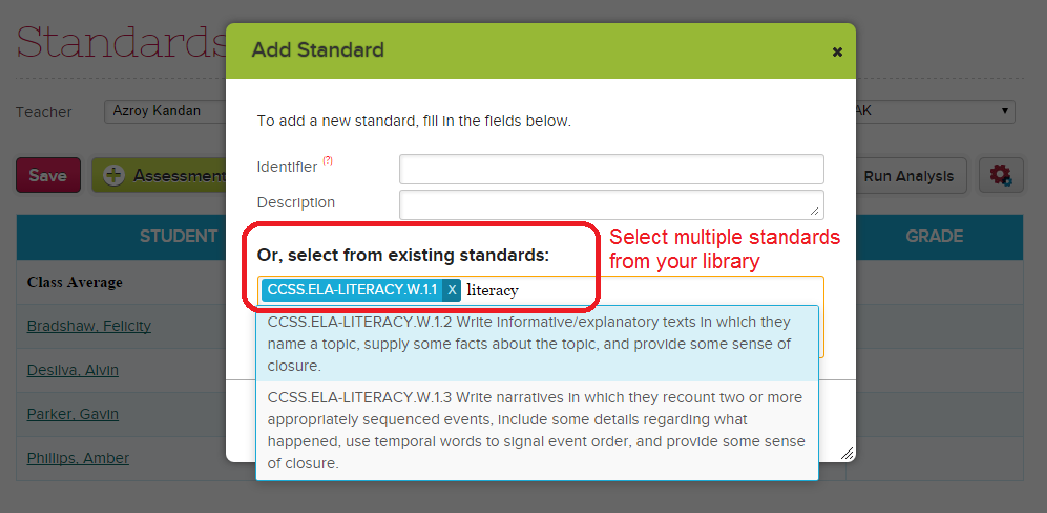
Add Standard
Add Standards to the Standards-Based Gradebook
When adding a new standard, you have 2 options. At the top, you can manually create a new standard for this subject. If you go this route, a new Standards Set will be create for this subject, and the standard will be added to it.
Alternatively, you can use the bottom section to simply select a standard from the library. Just click into the box, and start typing a few letters from the standard, and a list will appear. You can then select a standard by clicking it from the list.
Selected standards will appear as columns in your gradebook:Read More »
Before you begin, be sure to have your subjects and enrollments set up properly. If you’re already a user of QuickSchools (from previous years) you can set up the new school year by promoting your students. Students should also be enrolled into subjects beforehand. You can read about it here:
Also, go ahead and install the “Standards-Based Gradebook” in the QuickSchools App Store, and enabled it for the appropriate teachers. Once these steps are completed, you can proceed with the actual setup of the Standards-Based Gradebook.
NOTE: If you are using the “Standards-Based Gradebook” for a particular subject, you cannot use the regular Numeric-Based Gradebook for the same subject. This is because the report cards can only grab the Final Grades from ONE of the gradebooks.
Here is a summary of the steps:
OPTIONAL: Create your library of Standards
Create Standards Sets
Add Standards to Standards Sets
OPTIONAL: Configure your Standards-Based Gradebook
Configure how the final score is calculated for a particular standard
Configure how the Overall Grade for a particular subject is calculated based on assessed standards
Configure the Mastery Levels / Grading Scale
Start using the Gradebook
Define which standards will be assessed for the particular academic term
Create assessments by selecting specific standards to test for specific students
Review how students are performing based on assessed standards (Analytics)
Generate Report Cards: Report Cards will automatically display assessed standards for each student. The Subject-Based Gradebook also has an “Overall Grade” calculation for the subject, which can be transferred automatically into the report card.
Step 1: Creating your library of Standards
This is an OPTIONAL step, because you can actually create new standards directly from your Standards-Based Gradebook. However, if helps to build the library up front, so that teachers can easily select / include the relevant standards into their gradebooks. In this way, you can streamline your standards as well as categorize/group your standards into sets.
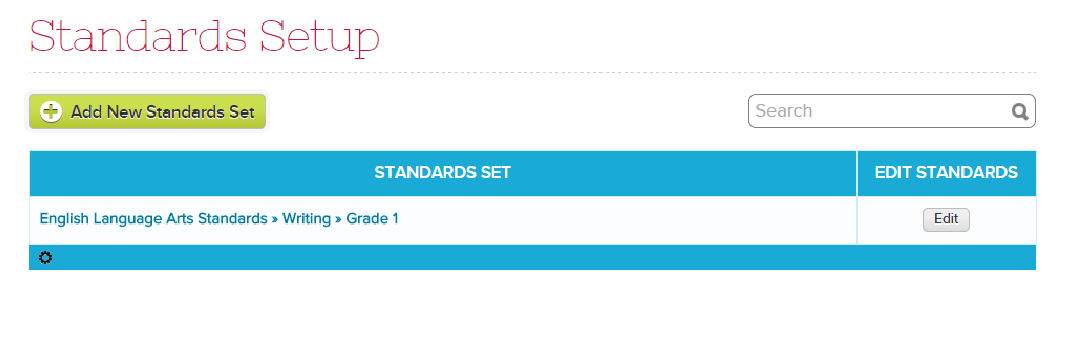
To create/manage your standards, just click on the “Standards” menu:
Setting up Standards Sets
Use the “Add New Standards Set” to create a new group/set of standards. Once a Standards Set is created, you can either update the set by clicking on the name of the set. Or, you can click on the “Edit” button to start adding/managing individual standards within the Set.Read More »