Copying Grades from one Gradebook to another

QuickSchools allows teachers to copy grades from one of their gradebooks into another existing gradebook. This could be helpful if the teacher needs to merge gradebooks, or if a student moves to another class.

First, go to the Gradebook where the grades are to be copied into (i.e. the destination gradebook) and click any student name. This will bring up a window that lists all the subjects the student is enrolled in. Click the Copy button to start the copy of grades:

The ‘Copy grades’ window appears where you can add students whose grades need to be copied. You can also map the columns accordingly:

Click the Copy Grades button to initiate the copy. A popup window will appear to confirm the copy:

Review the grades then click Save to complete the process.

For more information, please click our support article here: Copy Grades From One Gradebook To Another

Role-Based User Access

Quickschools allows school administrators to granularly control access to each module. Administrators can streamline access by using roles, or provide direct access to specific users.

Using TURN FEATURES ON/OFF, you can specify which user or role/s has access to each module:

Role-based User Access

Creating a role allows you to streamline user access. Assign multiple users to the same role, and then assign access to that role. Each user assigned to that role will then inherit all access given to that role. So instead of allowing access to multiple users from the Features page, you can just enter the role.

For example, in the Admissions module, instead of entering 2-3 names in the list of users, you can create an Admissions role and just enter this role when assigning access to Admissions module.

To create role/s, click SETTINGS > School Profile > School Roles:

In our example above, the Admission role has access to the Admissions module, but you can also give it access to other modules like say the Students module. So if you have a new Admission staff, simply add the user to the Admissions role and he/she will instantly have access to all assigned access, which in this example would be the Admissions and Students module.

We’d love to hear from you, please chat with us!

Activating a New Semester

In QuickSchools, academic terms are self-contained, meaning that when you edit/create subjects and enrollments in one semester, it does not affect other semesters within your account. Before activating a new term, we recommend checking out this article: Checklist when Transitioning to a New Term/Semester.

To activate the next term, go to New Semester Setup > View All Semesters > click Activate across the new term:


Activating the next term

Note: If you have not added the new term, click the Add New Semester button to create one.

In activating the next term, you’ll have the option to copy info from the active term or activate an empty semester:

Yes, copy info (Recommended) – the system copies all data from the active term into the new term. Subjects and enrollments are carried over – so you’re pretty much all set for the new semester. Note that some modules are reset so you’ll have a fresh semester to accommodate new data. This way data are separated by terms. Modules like Gradebook, Homework, Class Discussions, and Scheduling are blank when you start a new term.

No, just activate empty semester – you’ll get a new semester without subjects, grade levels, and homerooms. So all students won’t have assigned grade levels, no homeroom enrollments, and no subject enrollments. You’d have create the student grade levels and homerooms, then assign to students. You also need to create new subjects and enroll the students accordingly.

Once you have activated the new term, teachers can start doing the following on the fresh semester:

  • Take attendance
  • Enter grades in the Gradebook
  • Post homework, lesson plans, Class Discussions

Admins can also start creating report card for the newly activated semester (only if done with the previous semester’s report cards).

Important Notes:

  • In this article, the word TERM is also equivalent to SEMESTER and QUARTER. It simply refers to your grading periods within an academic year.
  • The instruction in this article shows how to activate a new term within the same academic year. If you need to activate a new academic year’s semester, check out our article – Creating New Academic Year.


Checklist when Transitioning to a New Term/Semester

We’re gearing towards the end of the term, what should I do to ensure I’m set for the next term?

Note: In this article, the word TERM also equates to QUARTER and SEMESTER – however you call the grading periods in your school.

The list below will help you identify if you’re ready for the next term:

  • Teachers are done taking attendance for current term
  • Teachers have completed entering Gradebook grades for the current term (but there’s a way for teachers to enter grades for the previous term, see below)
  • Report Cards grades are correct, and teachers are pretty much done entering comments in it.
  • No pending tasks on all the other modules like Homework, Class Discussions, etc.

Once you’re done with the items listed above, you’re all set to move to the next term. Click here for instructions in creating and activating a new term. After activating the new term, you’re good to go. Teachers may start entering attendance, grades, homework, and other data for the new term.

We’ve put in some FAQs that might be helpful for you:

1. When do I activate the next term?

Answer: We recommend activating the next term when the current term is about to end. This is to ensure that the latest data from the active term are copied into the next term.

In activating the next term, the system copies data from the active term into the new term. So if you added new subjects and enrollments after activating the next term, these data won’t appear in the next term; you’d have to recreate them in the next term.

2. Can we activate the next term ahead of time so we can start creating schedules, posting homework, etc.?

Answer: Yes, just take note of the things mentioned above.

3. What if I activate the term late?

Answer: Best practice would be to activate the new semester before it starts. This is to avoid possible problems it can cause to the teachers:

  • Attendance entered in the wrong semester
  • Grades entered in the previous semester’s Gradebook (e.g. Term-2 grades entered in Term-1 gradebook)
  • Homework, Lesson Plans, Class Discussions posted in the wrong semester

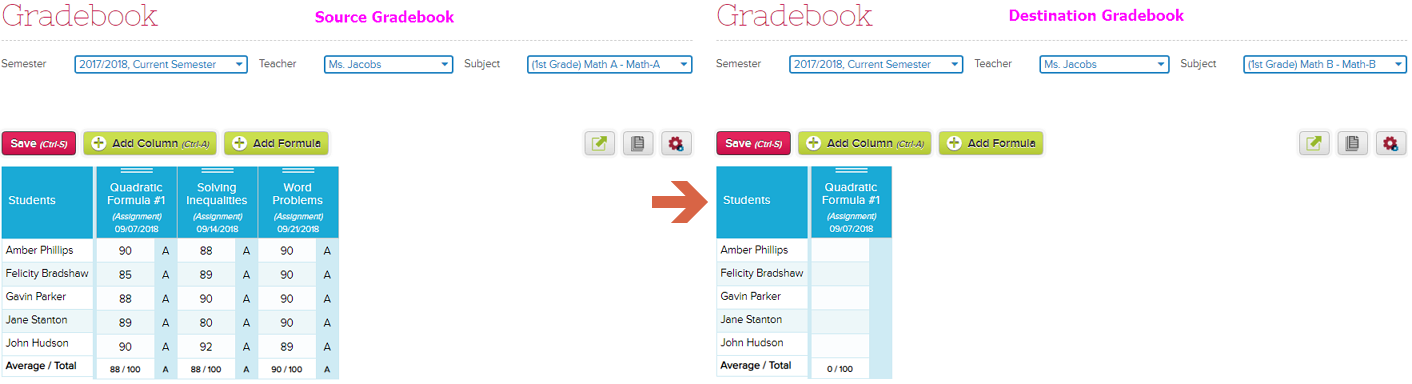
4. Can teachers enter grades in the Gradebook for previous terms?

Answer: Yes, the teacher simply needs to select the previous semester in the Semester drop-down box

5. Teachers are still entering comments in the Report Cards, can I go ahead and activate the next term?

Answer: Yes, you can migrate to the next term even if the teachers are still working on the current term’s report cards. Report Cards remain unlocked and editable until you lock/publish them. For more info in publishing report cards, click here.

6. What data gets copied into the new term?

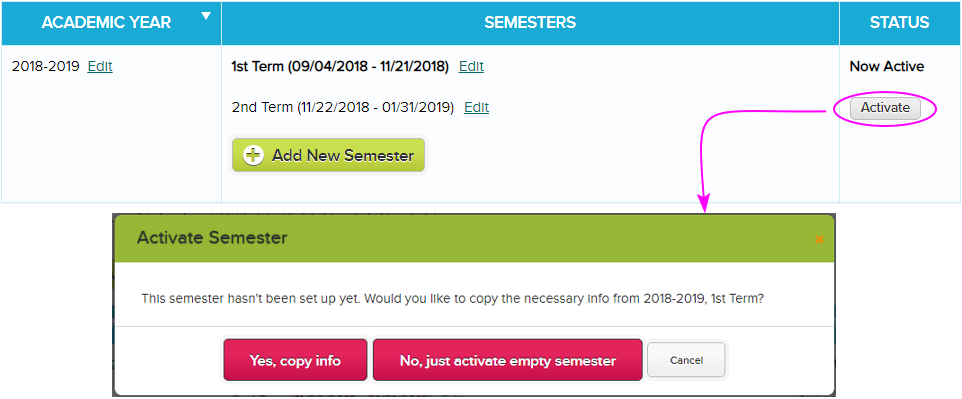
Answer: When activating a new term, you’ll have the option to copy data from the currently active term:

The system copies all data, but some modules are reset so you’ll have a fresh semester to accommodate new data. Modules like Gradebook, Homework, Class Discussions, Scheduling, etc. are blank when you start a new term.

If you activate an empty semester though, you’ll get a new semester with blank subjects, grade levels, and homerooms. So all students won’t have assigned grade levels, no homeroom enrollments, and no subject enrollments.

Taking Attendance via Seating Chart

Quickschools offers a new way to take attendance! Seating arrangement allows teachers to easily spot who’s absent in the class – and makes taking of attendance way easier. Having said so, we are introducing a new app called Homeroom Attendance Seating Chart. Teachers can then easily mark absent students in a single glance. No need for a roll call!

This feature currently supports Homeroom Attendance.

If you want to use this feature, simply download our app  via APP STORE. For instruction on how to install and set this up, please check out our Support Site article: Homeroom Attendance Seating Chart

Importing Students and Teachers

Quickschools provides an efficient way to add student and teacher information in bulk — by importing information from an excel file. To do this you need to have your data accessible in an Excel file, one with either an “.xls” or “.xlsx” extension.

To initiate the import, simply click the Import button under Students/Teachers tab:


QuickSchools will automatically analyze your file and map commonly-named columns to the fields in QuickSchools. But you can override the mapping as you see fit:


Student Import mapping


Teacher Import mapping

You can also use this procedure to update student and teacher records. To update student records, your import file simply needs to contain the student names that match the student names in the system. During the import, when the system finds an existing record for a student on file, it updates the existing record instead of creating a new one. The same goes for updating teacher information via Import.

TIPS

  • When updating student records, the name in the file needs to be an EXACT match of the student name in the system (no extra spaces, case sensitive); Otherwise, Quickschools will create a new record for the student.
  • To avoid creating new student records instead of updating existing ones, we recommend including the Student Number/ID in the import file. In doing so, the system will match students based solely on the Student Number/ID. This will address situations where you may have multiple records with the same exact name.

You can get a sample of the import files below:


For more info on adding student and teacher information into Quickschools, please check out our Support articles below:

Adding Students To Quickschools

Adding Teachers To Quickschools


Let us know what you think, please chat with us!


Paid Mass (Parent) Messaging

Quickschools Parent Messaging allows school users to send messages to parents, students, and teachers via email, text (SMS), and voice message. These school users are the teachers, staffs, school admins, etc.

Sending of emails is always freely available even for trial subscriptions. Text and voice messages on the other hand follows a pre-pay system so you’d need to purchase a credit to use them. This credit gets used up as you send out messages via text or voice.

To purchase a credit, your account needs to be subscribed with Quickschools. You’ll have the option to buy credit once you have subscribed:

After buying a credit, the Send Text Message and Call Phones buttons become available so you can start sending text and voice messages:Read More »

QuickSchools Gradebook

The QuickSchools Gradebook is one of our core modules and we spend a lot of time making sure teachers have the best possible experience when working with it. We’ve been taking teachers’ feedback and have made a lot of improvements over time.

We’ve organized different articles, and tailored them for admins and teachers. Please see the list of articles below.

Gradebook Setup for Admin

Administrators can easily and conveniently configure Gradebook Settings for the entire school via the Grading Setup menu. These settings will be reflected in every teacher’s Gradebook. Check out the article here: Gradebook Setup For Admins

Gradebook Setup for Teachers

Teachers can set up their own grading scales and categories if permitted by the school admin. Otherwise, they have to use what the admins have centrally set up for the school. But teachers can configure other Gradebook settings based on their preference. Learn more from the article: Gradebook Setup for Teachers

Gradebook Basics – How to use the Gradebook

<coming soon>

Advanced Gradebook Features

<coming soon>